|
|
| (32 intermediate revisions by 3 users not shown) |
| Line 1: |
Line 1: |
| | [[Category:Engine]] | | [[Category:Engine]] |
| − | '''Need visual aids?''' Please see our [[Oil Change Photographs|photographic oil change]] article. Read both articles, please. There are some things that are only in one.
| + | ====Stuff you need==== |
| | | | |
| − | ====What is the oil change procedure?====
| + | Once you decide to change the oil in your bike, the process is not that difficult. First, gather together the needed supplies. You'll need 2 quarts of [[Preferred Brands|oil]], a [[Oil Filters| filter]] and a drain pan. You should also have a new drain plug washer (part number 92065-097). This is a very common part, fitting dozens of Kawasaki motorcycles. Your dealer ''should'' have some around. |
| | | | |
| − | Warm up the engine. Turn off the engine and let it sit for a few minutes; place the bike on centerstand. Removing the lower fairing is optional; some people prefer to do it because it's quick, gives you a bit more room in which to work, and minimizes mess; others think it's not worth the effort, so it's up to you; it's held on by 7 bolts. Remove the drain plug bolt on the bottom of the engine over a 3+ qt container (don't burn yourself). Removing the oil filler cap will help the oil drain faster. Let the oil drain for 15-20 minutes, then replace the bolt, using a new drain plug gasket, #92065. (Many people don't replace these every time, but they're cheap. Stock up.) Tighten to 14.5 lb/fts; don't overtighten it or you risk stripping the threads out of the engine case. This is difficult to fix. Remove the oil filter bolt and filter retainer, just in front of the drain bolt. More oil and a dirty filter element will come out. Be sure to keep all the springs/grommets in order.
| + | One other thing that you will have to have before you start changing the oil is a [http://faq.ninja250.org/wiki/What_should_a_good_set_of_tools_include%3F#Misc torque wrench]. '''This is mandatory.''' Learn how to use it before you change your oil for the first time. Don't practice on your drain plug. |
| | | | |
| − | Place the new filter (see [[Oil Filters|oil filter page]] for options) on the retainer, and replace the assembly, again torquing the bolt to 14.5 ft/lbs. Open the filler cap on the right side of engine if you haven't already. Fill w/ 1.5 qts of your favorite oil. Wait a minute, then add a very small amount of oil at a time until oil is halfway up the level-check window. Replace the filler cap. Start up the bike and let it run for a minute, then shut off the engine and wait a few minutes before checking the window again. Put another few ounces of oil in. Repeat until oil level is consistently in the center of the view window. Centerline in the window while the bike is on centerstand is the same as full with both wheels on the ground. (The bike is tilted forward and isn't level when on the centerstand, so the level appears lower than when both wheels are on the ground.)
| + | ====The process==== |
| | | | |
| − | Do not overfill (you could blow a gasket).
| + | Warm up the engine by [[Warming up your engine|riding it]]. Turn off the engine and let it sit for a couple minutes. Place the bike on the centerstand. Removing the lower fairing is optional. Some people prefer to do it because it's quick, gives you a bit more room in which to work, and minimizes mess; others think it's not worth the effort, so it's up to you; it's held on by 7 bolts. |
| | + | |
| | + | First, remove the drain plug and drain the oil into a suitable 3+ quart pan (don't burn yourself). Removing the oil filler cap will help the oil drain faster. Let the oil drain until it's obvious that no more is going to come out. This will usually be 5+ minutes. |
| | + | |
| | + | [[Image:2Winterize.jpg|110px]] |
| | + | |
| | + | The drain plug and filter bolt can be quite stubborn to remove, so use a 6-point socket (17mm for the oil filter and drain plug) and long-handled ratchet, shown below. A 6-point socket is superior to a 12-point because it fits the bolt/nut better, providing more surface area and less chance of rounding off the head. In some more drastic cases a [http://faq.ninja250.org/wiki/Image:Breaker_bar.jpg breaker bar] may be helpful. Do not use your torque wrench to loosen the drain bolt; torque wrenches are only for checking torque as you tighten a bolt. |
| | + | |
| | + | [[Image:2.1Winterize.jpg|150px]] |
| | + | |
| | + | Make '''darn sure''' you are turning the wrench in the right direction. Make sure you don't spin the bike or pull it over on top of you while you're putting pressure on the ratchet. If the bolt is so tight that you really have to pull hard on it, get some help so these things don't happen. [[Supporting Your Bike While Servicing|Other suggestions]] for supporting the bike. |
| | + | |
| | + | After the oil drains, remove the filter bolt and plate, just in front of the drain bolt. More oil and a dirty filter element will come out. Be sure to keep all the springs/grommets in order. Once the oil is drained and the filter removed, check the filter for debris. If you see metal particles or other debris, it could mean serious engine damage is occurring. This filter looks clean, so it's time to install the new filter and o-rings. |
| | + | |
| | + | [[Image:3Winterize.jpg|110px]] |
| | + | |
| | + | Before replacing the filter, install new o-rings on the filter bolt and plate. Coat the O-rings with oil before installation. Not doing so could cause a tear when you put everything back on. |
| | + | |
| | + | [[image:600.jpg|110px]] |
| | + | |
| | + | Note that many riders do not replace the small o-ring at every oil change; if you don't separate the bolt from the plate, you should maintain a good seal. |
| | + | |
| | + | [[Image:4Winterize.jpg|140px]] [[Image:5Winterize.jpg|110px]] |
| | + | |
| | + | Once the o-rings are in place, insert the bolt back into the filter plate. The oil filter assembly consists of the bolt/plate, a spring, a washer, the filter element, and the filter retainer. Note that the washer has a tendency to stick to the filter; check for it before pitching the old filter. |
| | + | |
| | + | [[Image:6Winterize.jpg|110px]] |
| | + | |
| | + | Place the spring over the bolt, follower by the washer as shown. |
| | + | |
| | + | [[Image:7Winterize.jpg|110px]] |
| | + | |
| | + | Then, place the filter element on the bolt. Dip your finger in your new oil and spread a bit around the two inner grommets on the filter, where it rides over the bolt. Then add the retainer as shown. |
| | + | |
| | + | [[Image:8Winterize.jpg|110px]] |
| | + | |
| | + | The filter assembly is now ready to install. Dip your finger in your new oil and spread a bit around the large o-ring to prevent it from catching and being pulled out of its groove as you tighten the assembly. Screw the bolt into the crankcase, making sure the o-ring stays in place. Tighten the filter bolt to 14.5 ft/lbs. |
| | | | |
| | Here is a diagram of the filter assembly. | | Here is a diagram of the filter assembly. |
| | | | |
| − | [[Image:oil filter assembly.jpg|150px]] | + | [[Image:OIL_PUMP_OIL_FILTER-2.png|100px]] |
| | | | |
| − | '''A common mistake''' when putting the oil filter assembly back together is to forget to replace the small washer (part #92022 in the diagram). Many a rider has finished draining his/her oil pan, only to find a tiny surprise at the bottom. Should this happen to you, there's no need to worry; one of our administrators admitted to riding 20,000 miles without his. However, it's really better to have it in there. Reinstall it at your next oil change. One good way to remember is to staple it to your manual at the oil change page.
| + | Make sure the drain plug washer is installed on the drain plug and tighten the drain plug to 14.5 ft/lbs (the same as the filter bolt). Use a new drain plug washer (92065-097 GASKET, 12X22X2). Many people don't replace these every time, but they're cheap. Stock up. When you reuse the crush washer, you run the risk of oil seeping out around the already compressed (old) crush washer. Why skimp on a $0.33 part (92065-097 from [http://ronayers.com/ ronayers.com])? Two alternatives are Hyundai part #21513-23001 or Nissan #11026-01M02. |
| | | | |
| − | '''Note on the O-rings:''' Your new filter will usually (not always) come with two new O-rings. It's fairly obvious where the larger one (#671 in diagram above) goes, inside the filter assembly cap. The small one (#670) is supposed to go on the bolt that holds the whole assembly together, but if you leave the bolt attached to the cap (#14025) there's no need to change this O-ring. Hang on to it, though, on the very off chance that the old one starts leaking. Most club members rarely change it and never have any problems.
| + | [[Image:9Winterize.jpg|110px]] |
| | | | |
| − | ====Often forgotten: Checking the oil screen====
| + | The torque value of 14.5 ft/lbs is '''very important'''. Don't over-tighten it or you risk stripping the threads out of the engine case. This is difficult to fix. |
| | | | |
| − | You should pull the oil screen, which is under the smaller round cover just behind the oil filter on the bottom of the motor. Remove the 5 bolts holding the cover on (8mm socket), and remove it. If the cover is very stiff to remove (and most are), tap it gently sideways with a rubber or plastic mallet once the bolts are removed. The screen is held in by the rubber bushing around the edges - you should be able to gently pull it out with your finger. Oil flows through it from the top, so you MUST remove the screen to clean the top side.
| + | After you have both the filter '''''and''''' the drain plug installed and properly torqued, open the filler cap on the right side of engine if you haven't already. Fill with 1.5 quarts of your favorite oil. Wait a minute, then add a very small amount of oil at a time until the level in the sight glass is up to the upper mark. Replace the filler cap. Start the engine, make sure the oil light goes out, and let the engine idle for a minute. Shut the engine off and wait a few minutes before checking the window again. Add oil as necessary to bring the level up to the upper mark (when both wheels are on the ground). Repeat until the oil level is consistently in the center or higher of the view window. Keeping the oil at or close to the upper mark is desirable, but do not overfill it, as you could blow a gasket. This is why you're adding oil bit by bit. |
| | | | |
| − | Picture of the oil screen cover. Two of the five mounting bolts (the longest two) are circled in blue.
| + | [[Image:10Winterize.jpg|110px]] |
| | | | |
| − | [[Image:img_3242.jpg|150px]]
| + | You may also want to check the old oil for any contamination or debris. Dispose of old oil responsibly. (Recycle) |
| | | | |
| − | As usual, try to keep your parts organized while you take them off, but if you get confused, just remember that the longer two bolts correspond to the two circled in blue in the photo.
| + | [[Image:11Winterize.jpg|110px]] |
| | | | |
| − | It's not completely necessary to pull the screen, but you'd be surprised how many big chunks of stuff are in there. On Duke's Rally bike there was some trash in the engine before it was rebuilt. So, to be sure he got it all out, the screen was checked at every oil change after the rebuild. There was less trash in it with each oil change.. If it hadn't been cleaned, the screen would probably be 60-80% clogged. At the 20k oil change there were only a couple small pieces in the screen, so it probably won't need to be checked again for a while.
| + | Make sure you check for leaks, and [[How do I check my oil?|check your oil level]] frequently. Ride it for a few minutes and check for leaks again. Make sure there is no oil leaking from around the filter assembly or drain plug. |
| | | | |
| − | These pictures show a bike that had 8800 miles on it. The goop is most likely gasket sealant from when the two halves of the engine case were assembled. The excess has to go somewhere. The stuff that goes to the inside of the engine sometimes falls off into the oil.
| + | ====Notes==== |
| | | | |
| − | [[Image:538557.jpg|150px]] | + | *When the bike is on its centerstand the level in the sight glass will be lower. When both wheels are on the ground the level will show a more full reading. (The bike is tilted forward and isn't level when on the centerstand, so the level appears a little lower.) The recommended [[How do I check my oil?|check method]] is with both wheels on the ground, but there's only a small variation between on and off the centerstand; as long as you're in the middle of the sight glass or above with either method you're fine. Be happy and go ride. |
| | | | |
| − | In a new motor there will likely be less trash floating around, so it's recommended to check the screen at the second or third oil change, then every couple oil changes after that, until there's no new trash in the screen.
| + | *A common mistake when putting the oil filter assembly back together is to forget to replace the small washer (part #92022 in the diagram above). Many a rider has finished draining his/her oil pan only to find a tiny surprise at the bottom, or to find it stuck to the bottom of the old filter. Should this happen to you, there's no need to worry; one of our administrators admitted to riding 20,000 miles without his. However, it's really better to have it in there. Reinstall it at your next oil change. One good way to remember is to staple it to your manual at the oil change page. |
| | + | |
| | + | *O-rings: Your new filter will usually (not always) come with two new O-rings. It's fairly obvious where the larger one (#671 in diagram above) goes, inside the filter assembly cap. The small one (#670) is supposed to go on the bolt that holds the whole assembly together, but if you leave the bolt attached to the cap (#14025) there's no need to change this O-ring. Hang on to it, though, on the very off chance that the old one starts leaking. Most club members rarely change it and never have any problems. |
| | + | |
| | + | ====Airbox drain hose service==== |
| | + | |
| | + | Oil vapor and pressure in the engine crankcase are vented through a hose into the airbox. The idea is to burn the oil vapors off during normal engine operation. Sometimes liquid oil collects in the bottom of the airbox, instead of being burned during engine operation. To prevent the airbox from filling up with excess oil, there is a drain tube in the bottom of the airbox to allow the excess oil to drain. Oil in the airbox can be completely normal, especially if you do a lot of high-speed riding. |
| | + | |
| | + | This oil should be drained periodically, although don't expect much to come out under normal circumstances. There is a drain plug at the bottom of the hose. Find the end of the hose, right down by the swingarm and clutch release lever on the right side. You won't need to remove any body parts to get at it. You'll find a metal clip holding the plug in. Use a pair of pliers to squeeze the clip and move it up the hose. You can then use the pliers to pull the plug out. Just twist it a little; it's not threaded. Drain any oil that may have accumulated in the tube. Have a rag or small container handy to catch the oil. Replace the plug and move the clip back in place to hold it in. |
| | + | |
| | + | [[image:DSCN5172-3.jpg|90px]] |
| | + | |
| | + | ====Often forgotten: Checking the oil screen==== |
| | | | |
| − | As far as actual cleaning of the screen goes, you can pretty much just wipe the screen clean with a rag. If you do need to spray it, WD-40 works fine. There are no gaskets to worry about. Just remove, clean, and replace.
| + | This is something that should be done at least by the second or third oil change on a new bike, and on the first on a used one. For more information, [[Checking the oil screen|look here]]. |
Latest revision as of 09:34, 10 October 2011
Stuff you need
Once you decide to change the oil in your bike, the process is not that difficult. First, gather together the needed supplies. You'll need 2 quarts of oil, a filter and a drain pan. You should also have a new drain plug washer (part number 92065-097). This is a very common part, fitting dozens of Kawasaki motorcycles. Your dealer should have some around.
One other thing that you will have to have before you start changing the oil is a torque wrench. This is mandatory. Learn how to use it before you change your oil for the first time. Don't practice on your drain plug.
The process
Warm up the engine by riding it. Turn off the engine and let it sit for a couple minutes. Place the bike on the centerstand. Removing the lower fairing is optional. Some people prefer to do it because it's quick, gives you a bit more room in which to work, and minimizes mess; others think it's not worth the effort, so it's up to you; it's held on by 7 bolts.
First, remove the drain plug and drain the oil into a suitable 3+ quart pan (don't burn yourself). Removing the oil filler cap will help the oil drain faster. Let the oil drain until it's obvious that no more is going to come out. This will usually be 5+ minutes.
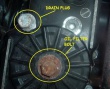
The drain plug and filter bolt can be quite stubborn to remove, so use a 6-point socket (17mm for the oil filter and drain plug) and long-handled ratchet, shown below. A 6-point socket is superior to a 12-point because it fits the bolt/nut better, providing more surface area and less chance of rounding off the head. In some more drastic cases a breaker bar may be helpful. Do not use your torque wrench to loosen the drain bolt; torque wrenches are only for checking torque as you tighten a bolt.
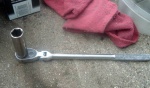
Make darn sure you are turning the wrench in the right direction. Make sure you don't spin the bike or pull it over on top of you while you're putting pressure on the ratchet. If the bolt is so tight that you really have to pull hard on it, get some help so these things don't happen. Other suggestions for supporting the bike.
After the oil drains, remove the filter bolt and plate, just in front of the drain bolt. More oil and a dirty filter element will come out. Be sure to keep all the springs/grommets in order. Once the oil is drained and the filter removed, check the filter for debris. If you see metal particles or other debris, it could mean serious engine damage is occurring. This filter looks clean, so it's time to install the new filter and o-rings.
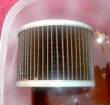
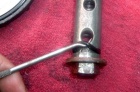
Before replacing the filter, install new o-rings on the filter bolt and plate. Coat the O-rings with oil before installation. Not doing so could cause a tear when you put everything back on.
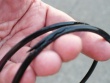
Note that many riders do not replace the small o-ring at every oil change; if you don't separate the bolt from the plate, you should maintain a good seal.
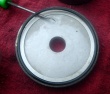
Once the o-rings are in place, insert the bolt back into the filter plate. The oil filter assembly consists of the bolt/plate, a spring, a washer, the filter element, and the filter retainer. Note that the washer has a tendency to stick to the filter; check for it before pitching the old filter.
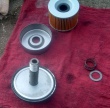
Place the spring over the bolt, follower by the washer as shown.
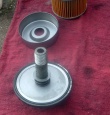
Then, place the filter element on the bolt. Dip your finger in your new oil and spread a bit around the two inner grommets on the filter, where it rides over the bolt. Then add the retainer as shown.
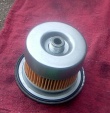
The filter assembly is now ready to install. Dip your finger in your new oil and spread a bit around the large o-ring to prevent it from catching and being pulled out of its groove as you tighten the assembly. Screw the bolt into the crankcase, making sure the o-ring stays in place. Tighten the filter bolt to 14.5 ft/lbs.
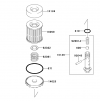
Here is a diagram of the filter assembly.
Make sure the drain plug washer is installed on the drain plug and tighten the drain plug to 14.5 ft/lbs (the same as the filter bolt). Use a new drain plug washer (92065-097 GASKET, 12X22X2). Many people don't replace these every time, but they're cheap. Stock up. When you reuse the crush washer, you run the risk of oil seeping out around the already compressed (old) crush washer. Why skimp on a $0.33 part (92065-097 from ronayers.com)? Two alternatives are Hyundai part #21513-23001 or Nissan #11026-01M02.
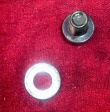
The torque value of 14.5 ft/lbs is very important. Don't over-tighten it or you risk stripping the threads out of the engine case. This is difficult to fix.
After you have both the filter and the drain plug installed and properly torqued, open the filler cap on the right side of engine if you haven't already. Fill with 1.5 quarts of your favorite oil. Wait a minute, then add a very small amount of oil at a time until the level in the sight glass is up to the upper mark. Replace the filler cap. Start the engine, make sure the oil light goes out, and let the engine idle for a minute. Shut the engine off and wait a few minutes before checking the window again. Add oil as necessary to bring the level up to the upper mark (when both wheels are on the ground). Repeat until the oil level is consistently in the center or higher of the view window. Keeping the oil at or close to the upper mark is desirable, but do not overfill it, as you could blow a gasket. This is why you're adding oil bit by bit.
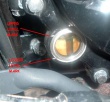
You may also want to check the old oil for any contamination or debris. Dispose of old oil responsibly. (Recycle)
Make sure you check for leaks, and check your oil level frequently. Ride it for a few minutes and check for leaks again. Make sure there is no oil leaking from around the filter assembly or drain plug.
Notes
- When the bike is on its centerstand the level in the sight glass will be lower. When both wheels are on the ground the level will show a more full reading. (The bike is tilted forward and isn't level when on the centerstand, so the level appears a little lower.) The recommended check method is with both wheels on the ground, but there's only a small variation between on and off the centerstand; as long as you're in the middle of the sight glass or above with either method you're fine. Be happy and go ride.
- A common mistake when putting the oil filter assembly back together is to forget to replace the small washer (part #92022 in the diagram above). Many a rider has finished draining his/her oil pan only to find a tiny surprise at the bottom, or to find it stuck to the bottom of the old filter. Should this happen to you, there's no need to worry; one of our administrators admitted to riding 20,000 miles without his. However, it's really better to have it in there. Reinstall it at your next oil change. One good way to remember is to staple it to your manual at the oil change page.
- O-rings: Your new filter will usually (not always) come with two new O-rings. It's fairly obvious where the larger one (#671 in diagram above) goes, inside the filter assembly cap. The small one (#670) is supposed to go on the bolt that holds the whole assembly together, but if you leave the bolt attached to the cap (#14025) there's no need to change this O-ring. Hang on to it, though, on the very off chance that the old one starts leaking. Most club members rarely change it and never have any problems.
Airbox drain hose service
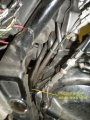
Oil vapor and pressure in the engine crankcase are vented through a hose into the airbox. The idea is to burn the oil vapors off during normal engine operation. Sometimes liquid oil collects in the bottom of the airbox, instead of being burned during engine operation. To prevent the airbox from filling up with excess oil, there is a drain tube in the bottom of the airbox to allow the excess oil to drain. Oil in the airbox can be completely normal, especially if you do a lot of high-speed riding.
This oil should be drained periodically, although don't expect much to come out under normal circumstances. There is a drain plug at the bottom of the hose. Find the end of the hose, right down by the swingarm and clutch release lever on the right side. You won't need to remove any body parts to get at it. You'll find a metal clip holding the plug in. Use a pair of pliers to squeeze the clip and move it up the hose. You can then use the pliers to pull the plug out. Just twist it a little; it's not threaded. Drain any oil that may have accumulated in the tube. Have a rag or small container handy to catch the oil. Replace the plug and move the clip back in place to hold it in.
Often forgotten: Checking the oil screen
This is something that should be done at least by the second or third oil change on a new bike, and on the first on a used one. For more information, look here.


