|
|
| Line 2: |
Line 2: |
| | *You are supposed to slip the feeler gauge between the actual camshaft lobe and the part of the rocker that the cam lobe pushes on. | | *You are supposed to slip the feeler gauge between the actual camshaft lobe and the part of the rocker that the cam lobe pushes on. |
| | | | |
| − | [[Image:feeler_gauge_goes_here.jpg|150px]] | + | :[[Image:feeler_gauge_goes_here.jpg|190px]] |
| | | | |
| | *The exhaust valves can be done without the Kawasaki tool, though it's very hard without moving the radiator. You don't need to drain the radiator, just move it. With the radiator out of the way and a 1/4" drive deep socket and an eyeglass-type screwdriver, they're quite easy. | | *The exhaust valves can be done without the Kawasaki tool, though it's very hard without moving the radiator. You don't need to drain the radiator, just move it. With the radiator out of the way and a 1/4" drive deep socket and an eyeglass-type screwdriver, they're quite easy. |
| Line 18: |
Line 18: |
| | *Finding the correct amount of gap with a feeler gauge is easier if you use a "go-no go", or "stepped" gauge. The old school technique was to feel a little drag on the feeler guage... it was described as about what you'd feel when pulling a sheet of paper out from under a magazine or two. Slight drag. New way of thought is that ANY adjustment, within spec, is good enough (and it is for street riders). So you just make sure the gauge for the middle spec goes in fine, but the next thicker one doesn't go at all. The stepped feeler gauges have the smaller clearance on the first inch of the blade, and the next higher clearance on the upper part. This makes it easy to see where you are with just one gauge instead of flipping back and forth between two different ones. Like this: | | *Finding the correct amount of gap with a feeler gauge is easier if you use a "go-no go", or "stepped" gauge. The old school technique was to feel a little drag on the feeler guage... it was described as about what you'd feel when pulling a sheet of paper out from under a magazine or two. Slight drag. New way of thought is that ANY adjustment, within spec, is good enough (and it is for street riders). So you just make sure the gauge for the middle spec goes in fine, but the next thicker one doesn't go at all. The stepped feeler gauges have the smaller clearance on the first inch of the blade, and the next higher clearance on the upper part. This makes it easy to see where you are with just one gauge instead of flipping back and forth between two different ones. Like this: |
| | | | |
| − | :[[Image:stepped gauge.gif|200px]] | + | :[[Image:stepped gauge.jpg|250px]] |
| | | | |
| | *Leave the feeler gauge between the valve and rocker when tightening the locknut to prevent the gap from changing. | | *Leave the feeler gauge between the valve and rocker when tightening the locknut to prevent the gap from changing. |
Revision as of 11:46, 7 January 2007
- You are supposed to slip the feeler gauge between the actual camshaft lobe and the part of the rocker that the cam lobe pushes on.
- 190px
- The exhaust valves can be done without the Kawasaki tool, though it's very hard without moving the radiator. You don't need to drain the radiator, just move it. With the radiator out of the way and a 1/4" drive deep socket and an eyeglass-type screwdriver, they're quite easy.
- Make sure you know which ones are the exhaust and intake valves and the specs for each (hint; the exhaust valves are the ones closest to the exhaust pipes).
- Moving the radiator: Remove the mounting bolts and unfasten the filler neck so it can be pushed forward (no need to remove hoses), and remove the fan. Very easy to do, and it gives a lot more space.
- You don't need the special tools, but you DO need longer feeler gauges (about 5~6" long).
- You have to unbolt and remove the coils, but it isn't necessary to drill the spot weld to remove the brackets. The cover is no harder to get out with the brackets left in place than with the brackets removed. There is some disagreement on this point, so if you think it will make your life easier, go ahead and remove the coil bracket(s).
- As far as how much force to use on the feeler gauges, not that much. Just set it so the right gauge slides in and the next size up does not.
- Finding the correct amount of gap with a feeler gauge is easier if you use a "go-no go", or "stepped" gauge. The old school technique was to feel a little drag on the feeler guage... it was described as about what you'd feel when pulling a sheet of paper out from under a magazine or two. Slight drag. New way of thought is that ANY adjustment, within spec, is good enough (and it is for street riders). So you just make sure the gauge for the middle spec goes in fine, but the next thicker one doesn't go at all. The stepped feeler gauges have the smaller clearance on the first inch of the blade, and the next higher clearance on the upper part. This makes it easy to see where you are with just one gauge instead of flipping back and forth between two different ones. Like this:
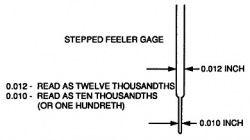
- Leave the feeler gauge between the valve and rocker when tightening the locknut to prevent the gap from changing.
- After you've taken out the radiator bolts and the coil bolts, it's even better to also "back out" the large long bolt that goes thru the front of the engine. Its the one that goes thru the two brackets (one on each side) that the radiator bolts to. If you back out that long bolt (it's the last one really holding the bracket) then you can move the bracket and the right side of the radiator further from the head and get more room to work.
- Split this job into two parts. Do all the prep work getting to the valves in the evening, then let the bike sit overnight (let the valve cover rest in place to keep Big things, like mice, out of there). Then in the morning, do the adjustments and button everything up and go for a ride.
- This splits the task in half, and keeps you from doing it after working a full week OR getting up really early before a planned ride. It's mostly just a bit of wasted time that you can use to your advantage.
There are two main ways that the Ninja 250 valve adjustment gets screwed up:
Wrong feeler gauge size.
- Some people make the mistake of using standard .10 gauges in the mistaken notion that that's what is called for. One quick way to tell if the gauges you are using are the proper ones is if the gauge is as thin as a piece of paper. If it's as thick as a quarter, that's the wrong size.
Measuring the gap when the cam lobes are actuating the valves.
- What happens is that you align the timing mark on the crank, and then take the measurement, or try, and don't realise that the cam lobe is currently pushing the rocker arm down onto the valve. There is no clearance at this point. You need to turn the engine one more full turn until the mark lines up again, and the cam lobe isn't touching the rocker arm.
Basically, the engine is in the proper position when the exhaust (front wheel side) cam lobe is pointing toward the triple clamps, and the intake (rear wheel side) cam lobe is pointing towards the rear seat. That's when you can take the measurement on that cylinder.
And remember, you need to rotate the engine again when you are lining up the other cylinder. You can't do both cylinders without rotating the engine at least once.


